Application for photo editing on the Play Store aplenty ranging from free and paid. This time Androdeveloperss will make a tutorial on How to Make a DSLR Camera Effect in android. If you do not have a DSLR camera like me then you have to try this technique to trick your friends that you take pictures / hunting with a DSLR camera. This application name is After Focus, you can download this app for free in the play store. I think this application is very simple photo editor and different from the others but in this Focus After no Crop feature for this application is devoted only to edit pictures with the after effects focus and some other lighting effects options.

How to use this application is quite simple to have tools that are not confusing. That's why this app has a pretty good review so as to have 4.5 in the Play stores.
Okay then we just practice how to use the application Focus After this, for those of you who have not had an application please download the Play Store with the keyword "After Focus"'s free.
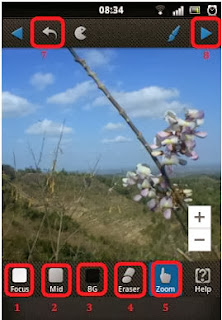
Tools-tools and functions
1. Determine which objects will be in focus
2. Creating the effect is rather vague on the back okyek focus
3. Creating Background blur
4. eraser
5. Zoom button
6. Undo
7. Next to proceed
Step:
1. Once downloaded and installed then opened, on initial appearance choose Select to open and select the photo that you want to edit
2. The selection to determine which objects to be focused and where the object will blur will see example image below
3. Once on a sense is just right press the next button in the upper right there you can choose a variety of effects ranging bokeh effects, lighting and so on
How to use this application is quite simple to have tools that are not confusing. That's why this app has a pretty good review so as to have 4.5 in the Play stores.
Okay then we just practice how to use the application Focus After this, for those of you who have not had an application please download the Play Store with the keyword "After Focus"'s free.
Tools-tools and functions
 |
| Tools |
1. Determine which objects will be in focus
2. Creating the effect is rather vague on the back okyek focus
3. Creating Background blur
4. eraser
5. Zoom button
6. Undo
7. Next to proceed
Step:
1. Once downloaded and installed then opened, on initial appearance choose Select to open and select the photo that you want to edit
2. The selection to determine which objects to be focused and where the object will blur will see example image below
 |
- Focus knob for selection of the red, for the object to be focus
- BG button for selection of black, to blur the background or objects
4. After completion save pictures or you can also directly share to social networks, the store requires 30-60 seconds wahtu tergantuk on your Android specifications
Before
After
Now picture are I edited earlier already had a variety of effects, your results depend on your ingenuity in the selection process.


